How do I upload products to receive?
Last updated: May 18, 2026
Quick answer
Use this article to open Receiving Item Manager, download the receiving template, and prepare a product upload for receiving.
Common use cases
- Receiving lead: Prepare an inbound product upload before receiving inventory.
- Warehouse lead: Confirm the receiving upload is tied to the right warehouse and merchant.
- Operations manager: Give a team member the correct template before a receiving session.
When to use this
- You need to upload products to receive.
- You need to download the receiving template.
- You need to choose the warehouse and merchant before uploading receiving data.
When not to use this
- A completed upload failed or produced errors.
- Received quantities do not appear in inventory.
- You need to receive against a purchase order with supplier-specific exceptions.
At a glance
| What you are doing | What you need | Good result | Contact us if |
|---|---|---|---|
| Use this article to open Receiving Item Manager, download the receiving template, and prepare a product upload for receiving. | Confirm the warehouse where the products will be received. Confirm the merchant for the receiving upload. | The receiving upload starts from the correct warehouse and merchant context, and the file follows the downloaded template. | The upload fails, the template requirements are unclear, the wrong warehouse or merchant was used, or inventory does not update as expected after upload. |
Before you start
- Confirm the warehouse where the products will be received.
- Confirm the merchant for the receiving upload.
- Use the downloaded template instead of building a file from scratch.
Steps
- Go to Inventory.
- Open Products.
- Select Receive products.
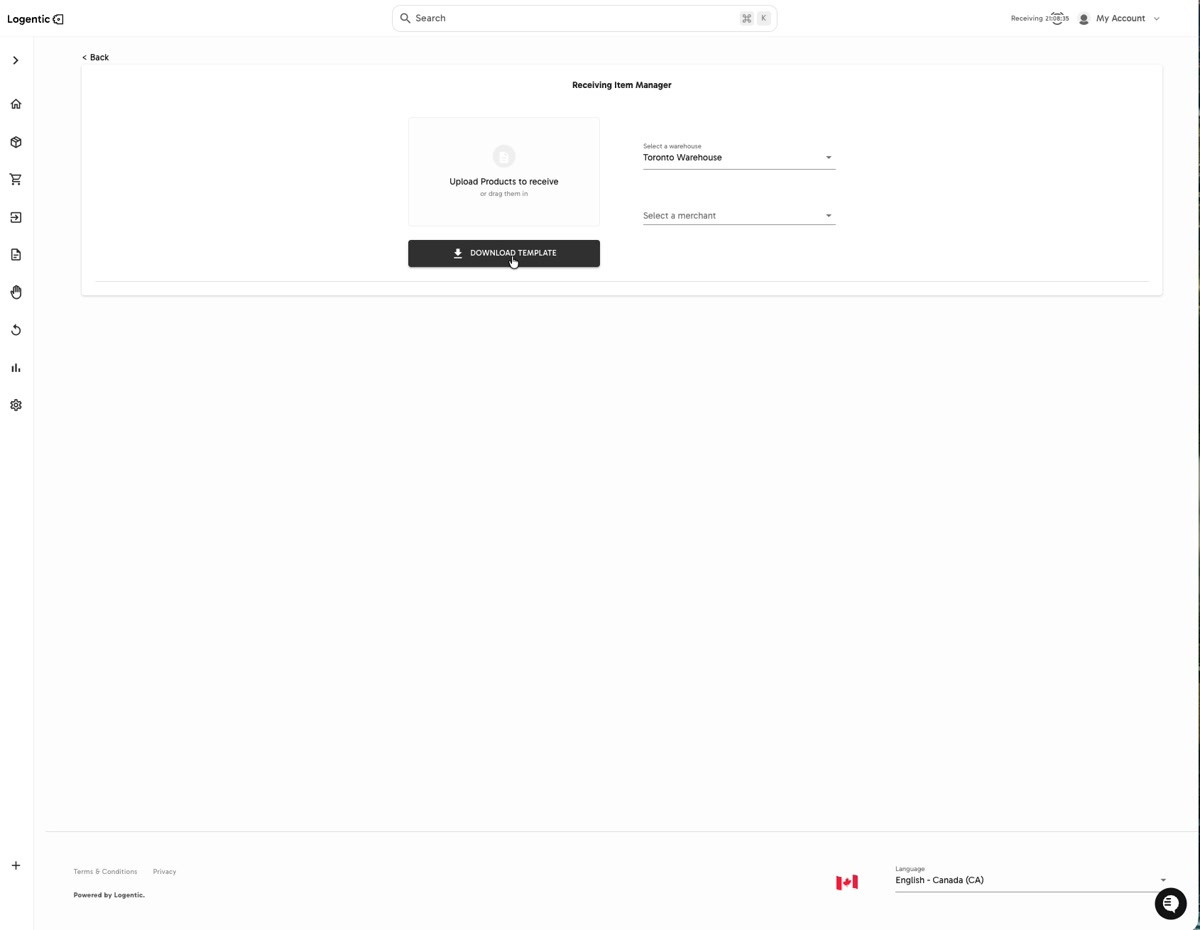
- Confirm you are on Receiving Item Manager.
- Select the warehouse in Select a warehouse.
- Select the merchant in Select a merchant.
- Select Download Template.
- Fill the template with the products you need to receive.
- Return to Receiving Item Manager.
- Upload the completed file using Upload Products to receive or drag the file into the upload area.
- Review any validation feedback before continuing with receiving.
Screenshots
Steps 3-10: Select Receive products, choose warehouse and merchant context, download the template, then use the upload area when the file is ready.
What good looks like
The receiving upload starts from the correct warehouse and merchant context, and the file follows the downloaded template.
Common issues and next actions
| If this happens | What to do next |
|---|---|
| The upload area is not accepting the file. | Confirm you used the downloaded template and that the file type is supported by your workspace. |
| The wrong warehouse or merchant is selected. | Stop before uploading. Change the warehouse or merchant so the receiving data goes to the right context. |
| The upload completes but inventory does not look right. | Do not keep uploading the same file. Capture the upload context and contact us. |
Contact us when
The upload fails, the template requirements are unclear, the wrong warehouse or merchant was used, or inventory does not update as expected after upload.
Contact options
- Email Logentic Support: best for detailed requests, screenshots, or follow-up context.
- Open in-app chat: fastest when you are already signed in and need help in context.
- Call Logentic: call (855) 529-0009 for an urgent launch, warehouse, or fulfillment blocker.
- Request Slack support access: ask us to add your team to a shared Logentic support channel.
Send us this information
- Screenshot of Receiving Item Manager.
- Warehouse selected.
- Merchant selected.
- File name uploaded.
- Any validation or error message.
- Expected receiving result.
- Actual receiving result.
- SKU examples affected.
- Time and timezone of upload.
Related workflow
- Open Product Dashboard.
- Select Receive products.
- Download the template.
- Upload the receiving file with the correct warehouse and merchant selected.
- Contact us if the upload or resulting inventory does not match expectation.