How do I create a purchase order from Purchase Inventory?
Last updated: May 18, 2026
Quick answer
Use this article to create a purchase order from products selected in Purchase Inventory.
Common use cases
- Buyer: Convert selected products into a purchase order for one supplier and warehouse.
- Operations manager: Review costs, quantities, shipping company, and expected delivery date before submitting a PO.
- Warehouse lead: Confirm the PO was created so receiving can prepare for incoming inventory.
When to use this
- You already reviewed Purchase Inventory and are ready to create a PO.
- You selected products that should be ordered from a supplier.
- You need to submit a PO before sending it to the supplier or receiving inventory later.
When not to use this
- You still need to assign suppliers to products.
- You need to send the PO email to the supplier.
- You need to receive the PO after inventory arrives.
At a glance
| What you are doing | What you need | Good result | Contact us if |
|---|---|---|---|
| Use this article to create a purchase order from products selected in Purchase Inventory. | Confirm the products have the right supplier and warehouse context. Review the visible stock, depletion, purchase-order, and suggested-quantity signals. | Logentic shows a success state, and the new purchase order appears on Purchase Order Dashboard with the expected supplier, warehouse, quantity, cost, status, and created date. | Products cannot be selected, supplier or warehouse options are wrong, required fields block submission, or the new purchase order does not appear after a success state. |
Before you start
- Confirm the products have the right supplier and warehouse context.
- Review the visible stock, depletion, purchase-order, and suggested-quantity signals.
- Know the quantities, expected delivery date, currency, payment term, and shipping company your team wants to use.
Steps
- Go to Purchase Orders.
- Open Purchase Inventory.
- Filter, sort, or search until the products you want are visible.
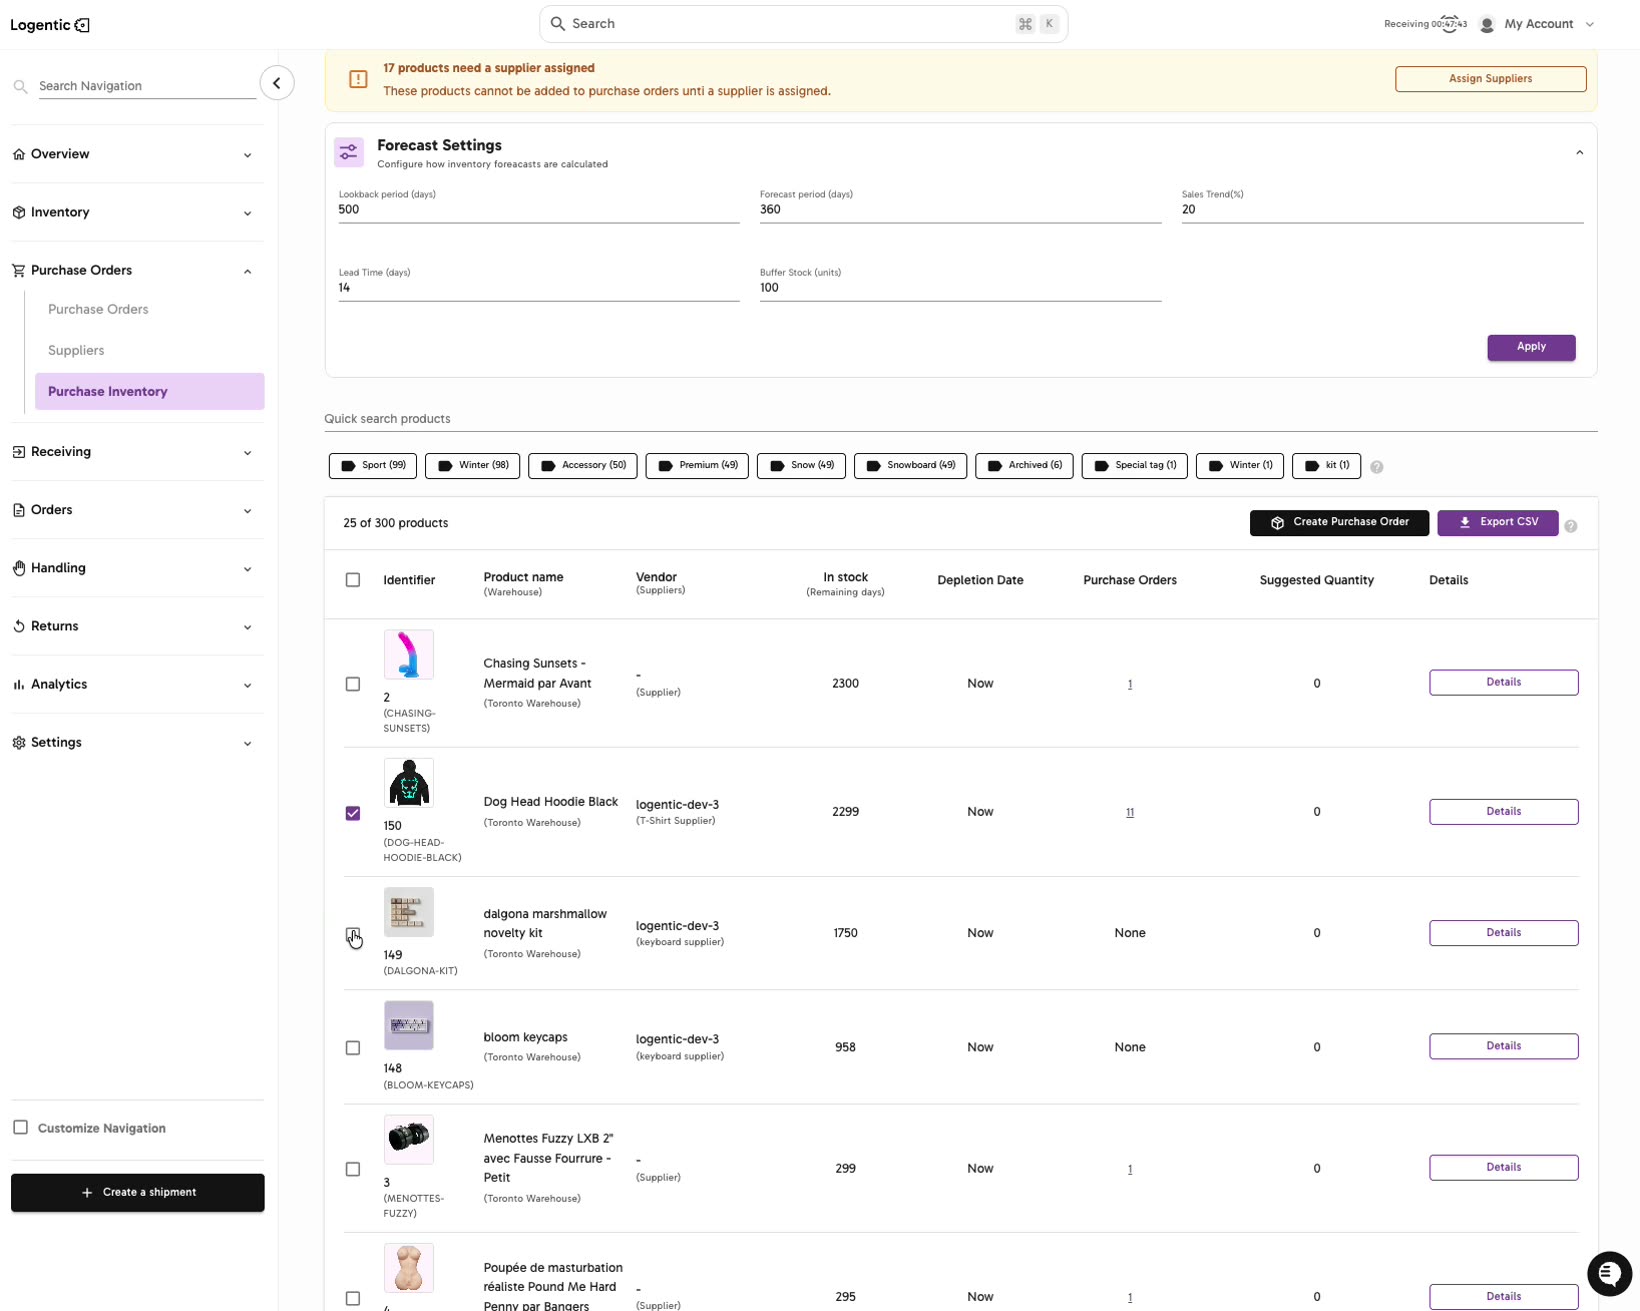
- Select the products you want to include in the purchase order.
- Select Create Purchase Order.
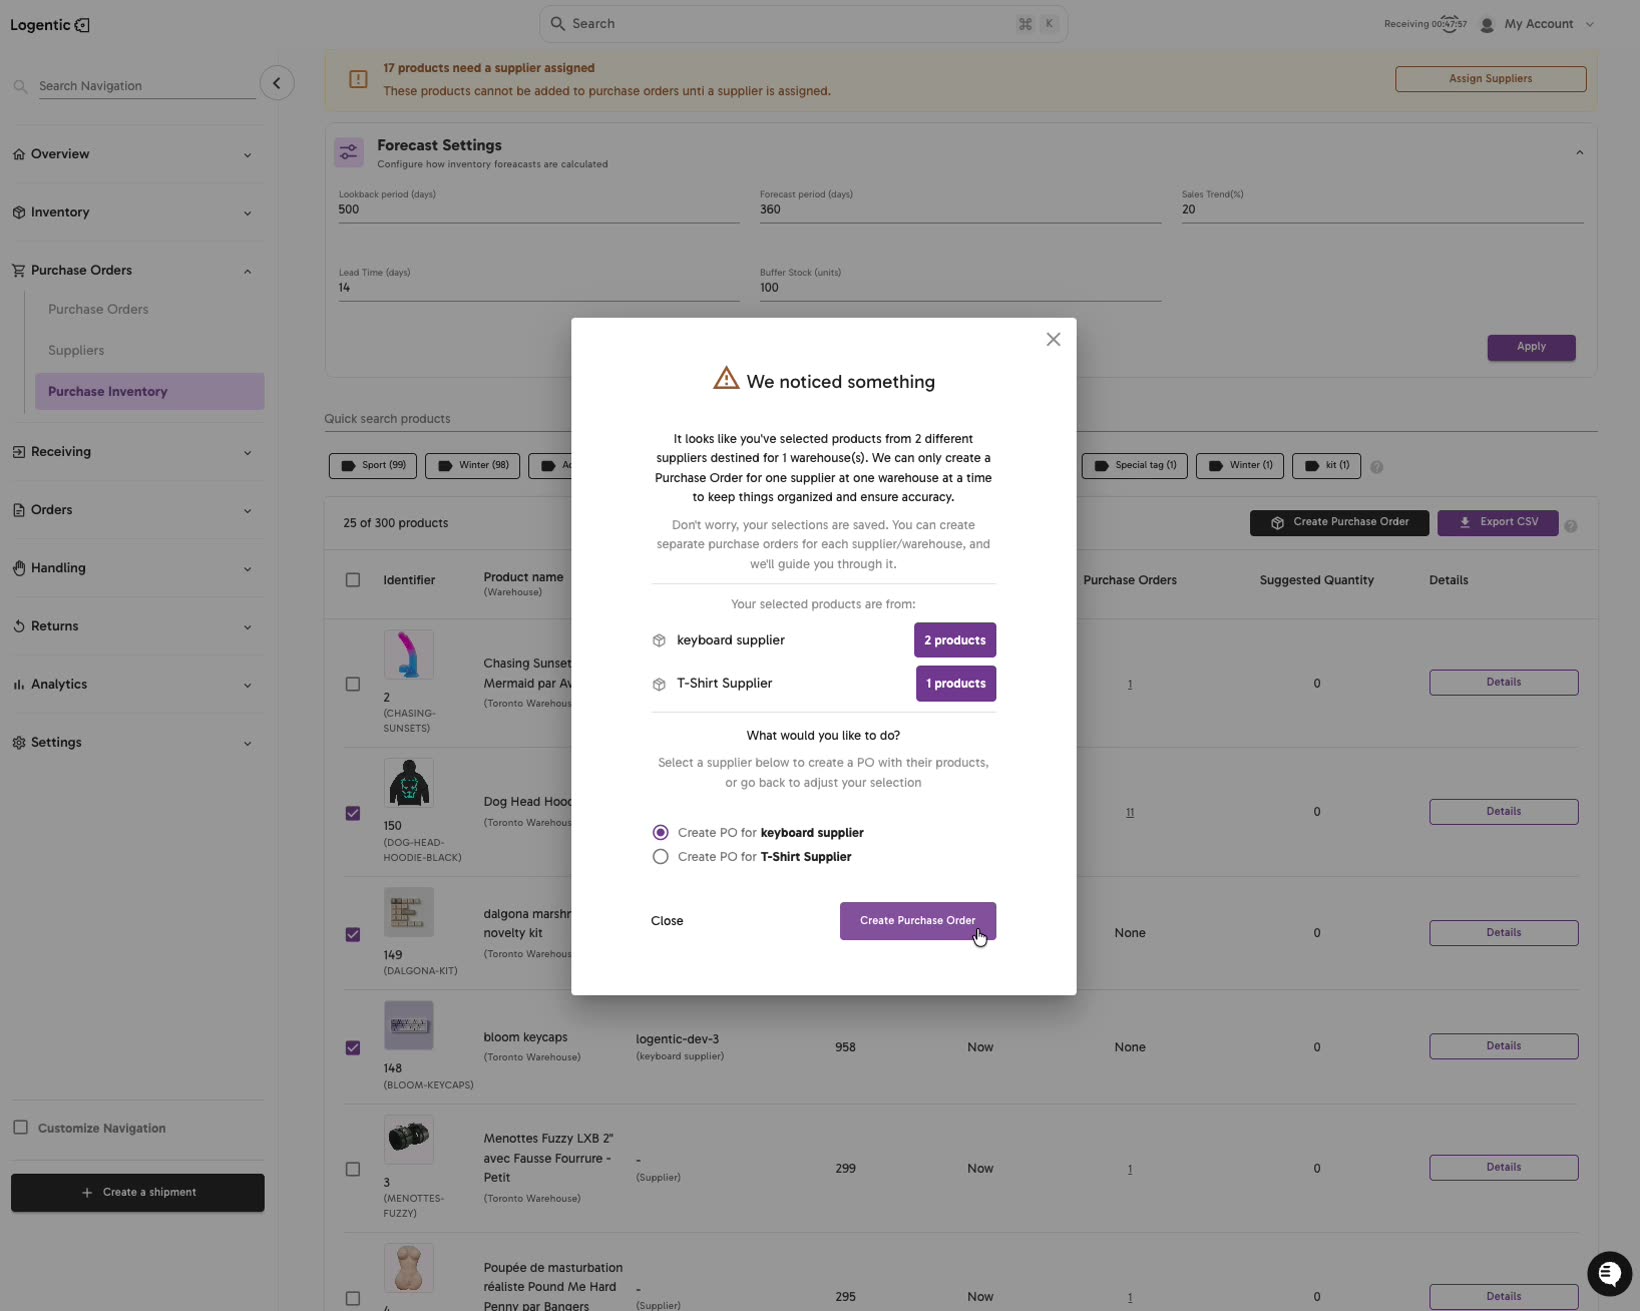
- If Logentic shows We noticed something, review the supplier and warehouse grouping message.
- Choose one supplier option from the modal.
- Logentic creates one purchase order for one supplier and one warehouse at a time.
- If you selected products from different suppliers or warehouses, create separate purchase orders for the remaining products.
- Select Create Purchase Order in the modal.
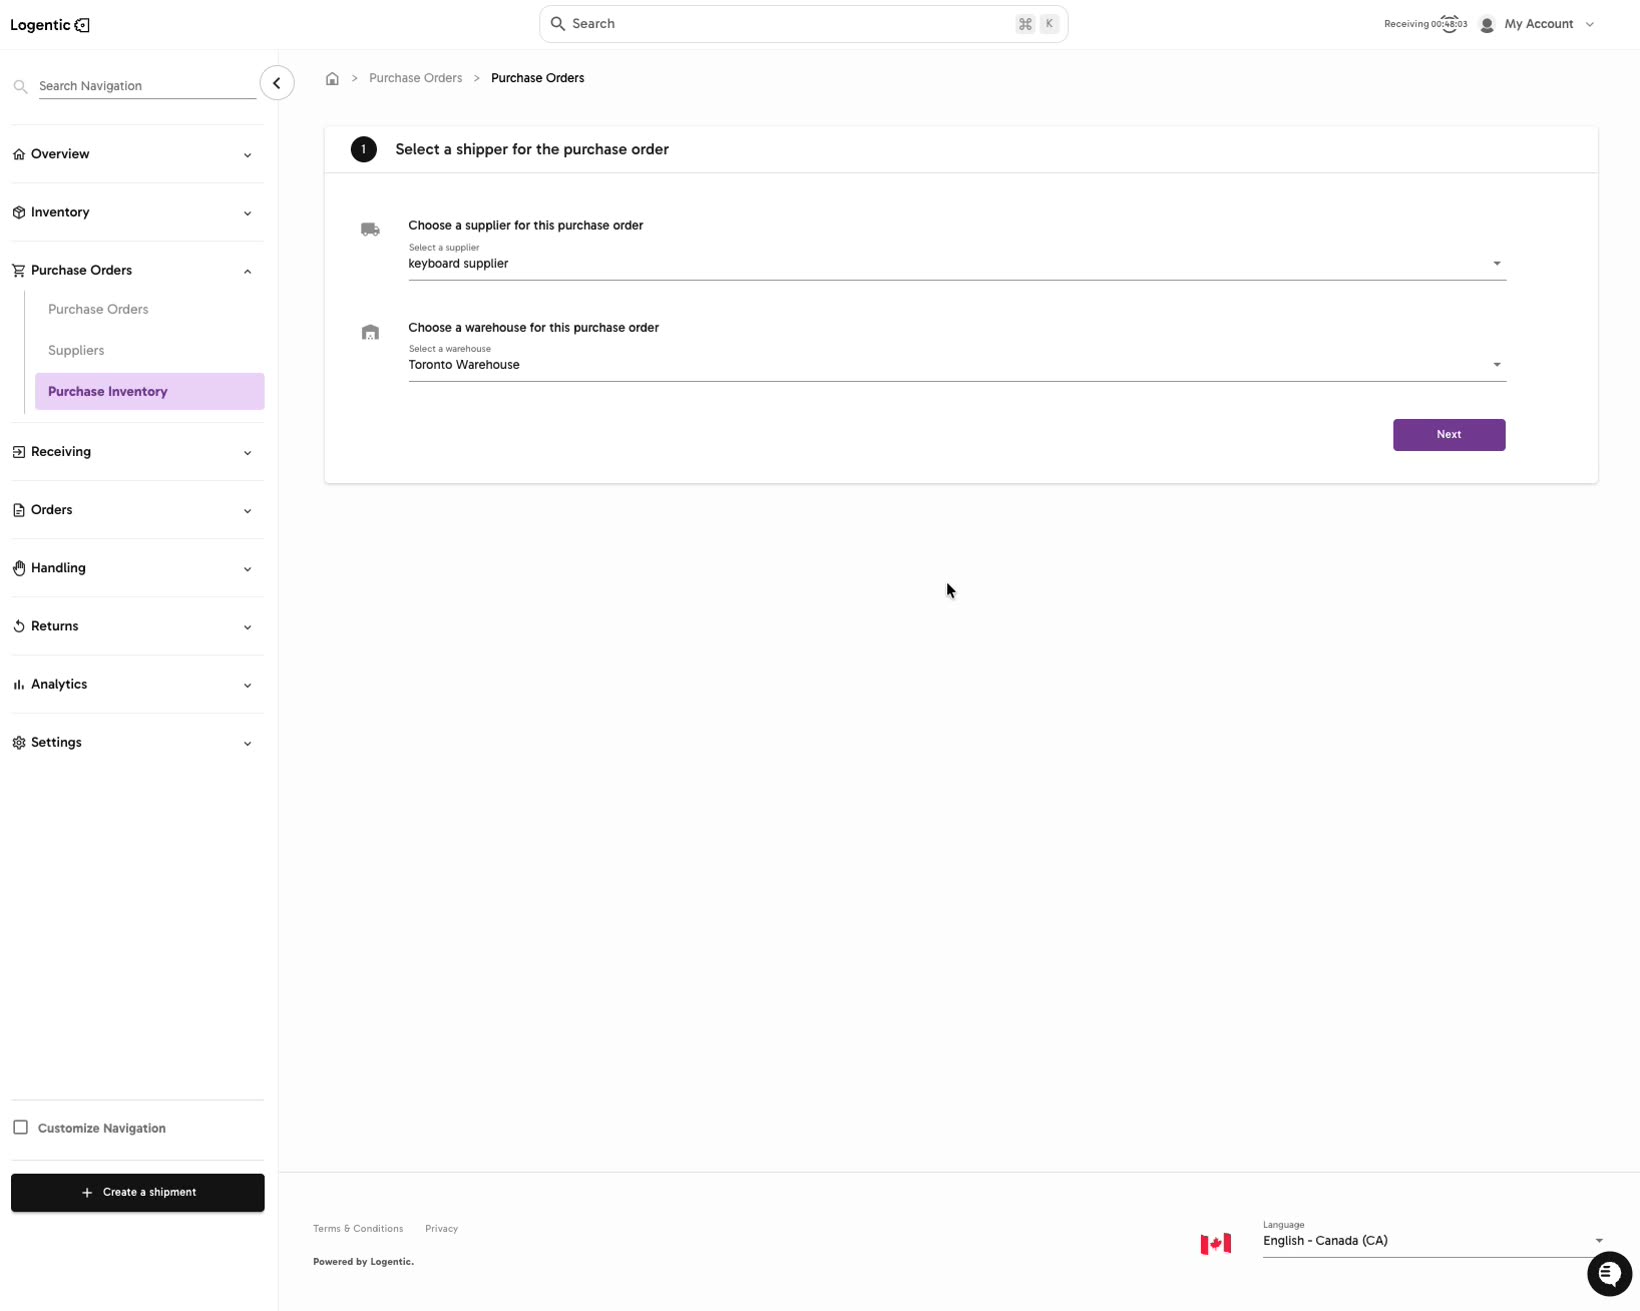
- In Select a shipper for the purchase order, choose the supplier.
- Choose the warehouse.
- Select Next.
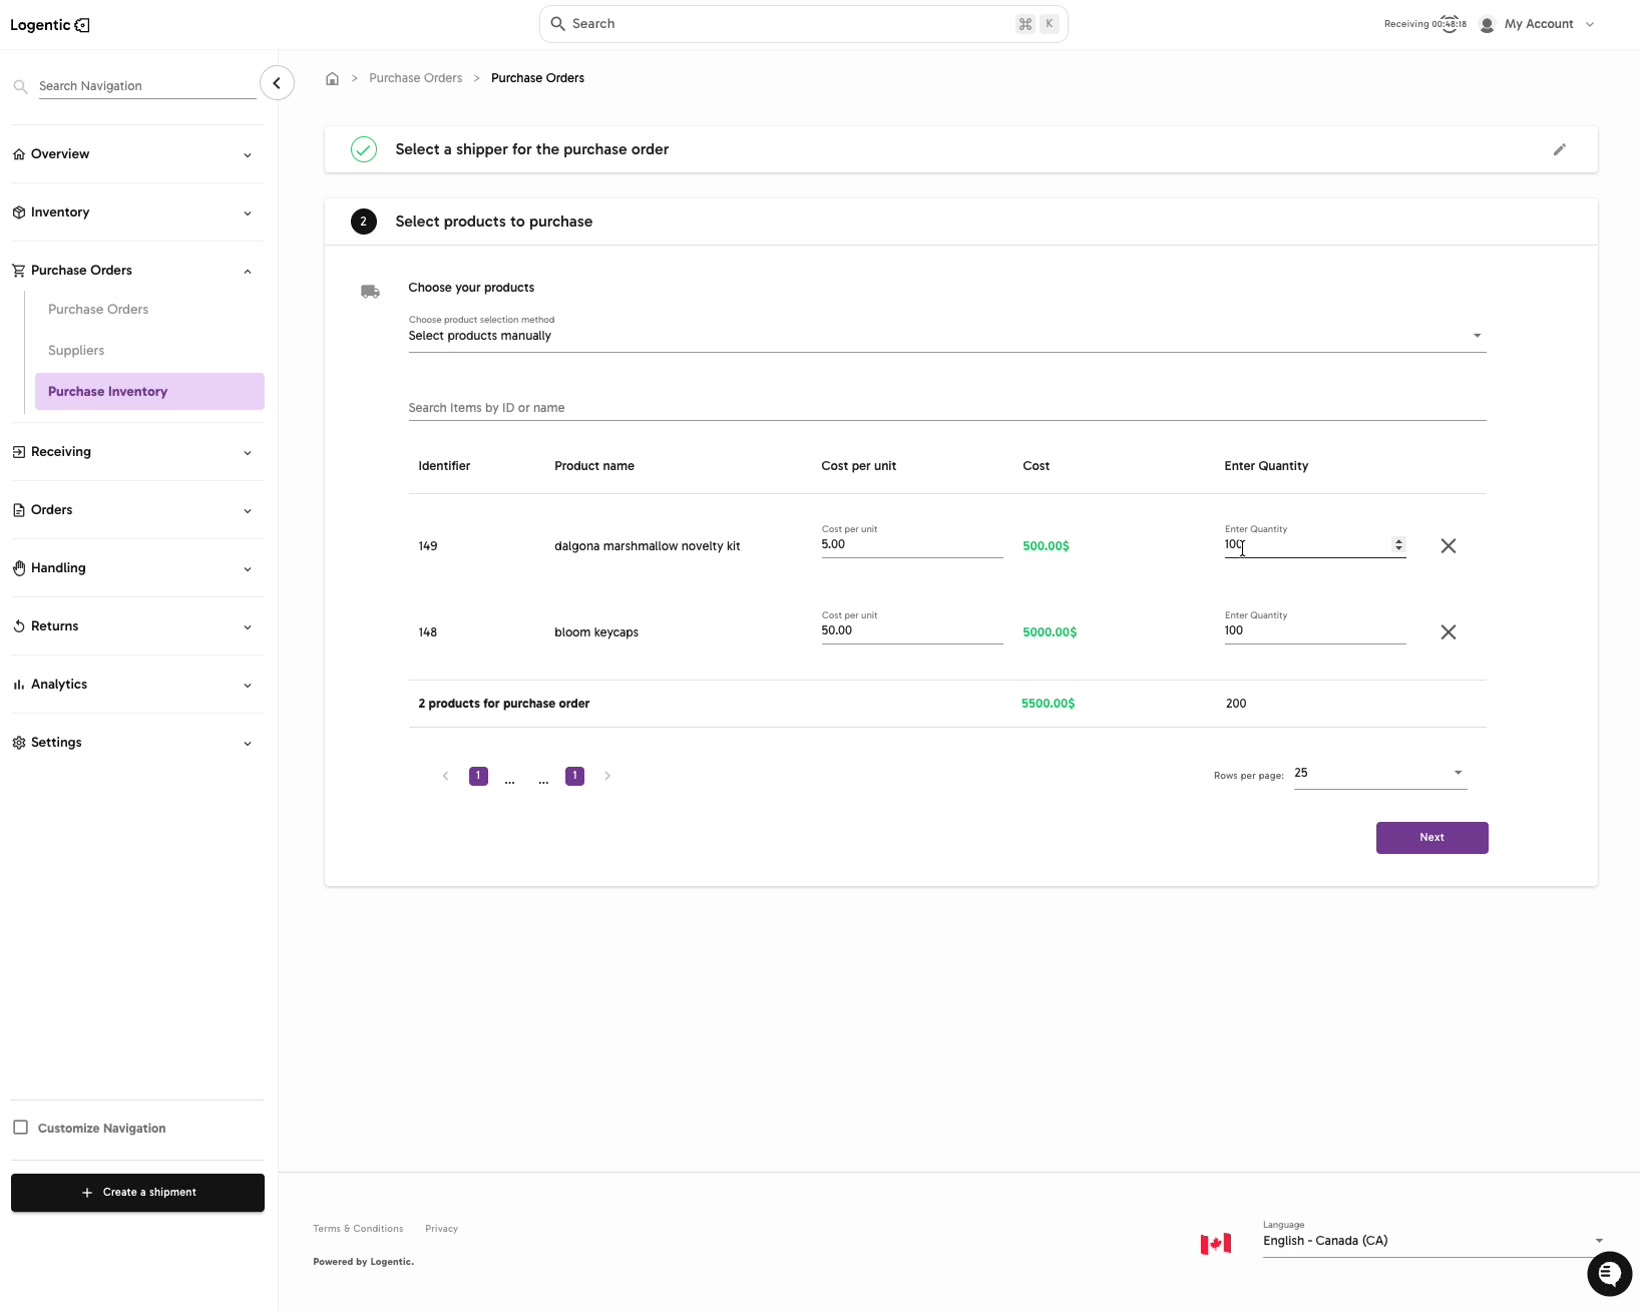
- In Select products to purchase, confirm the product selection method.
- Use Search Items by ID or name if you need to add or confirm products.
- Review each product row:
- Identifier
- Product name
- Cost per unit
- Cost
- Enter Quantity
- Enter the quantity for each product.
- Select Next.
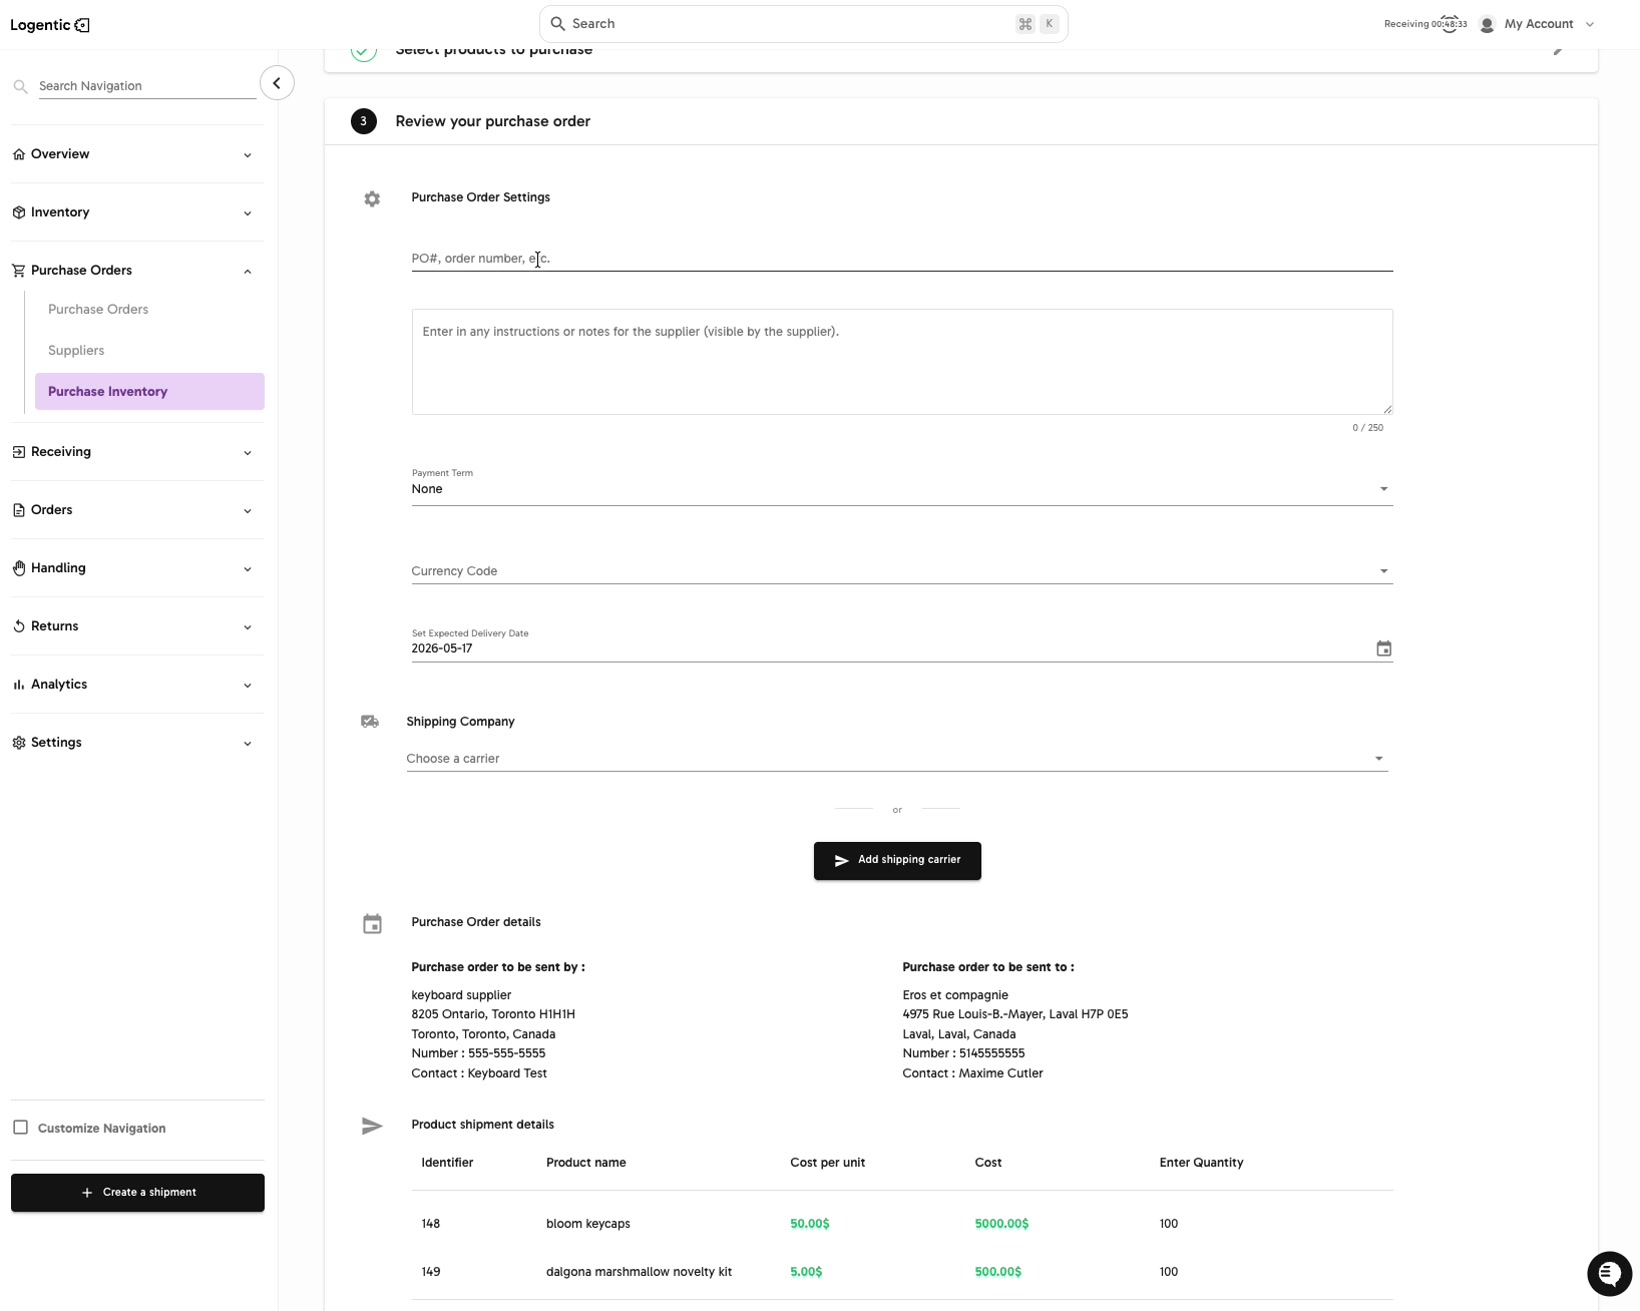
- In Review your purchase order, enter or confirm:
- PO#, order number, etc.
- Supplier instructions or notes
- Payment Term
- Currency Code
- Set Expected Delivery Date
- Choose a shipping company or use Add shipping carrier when needed.
- Review Purchase order to be sent by, Purchase order to be sent to, and Product shipment details.
- Select Submit purchase order.
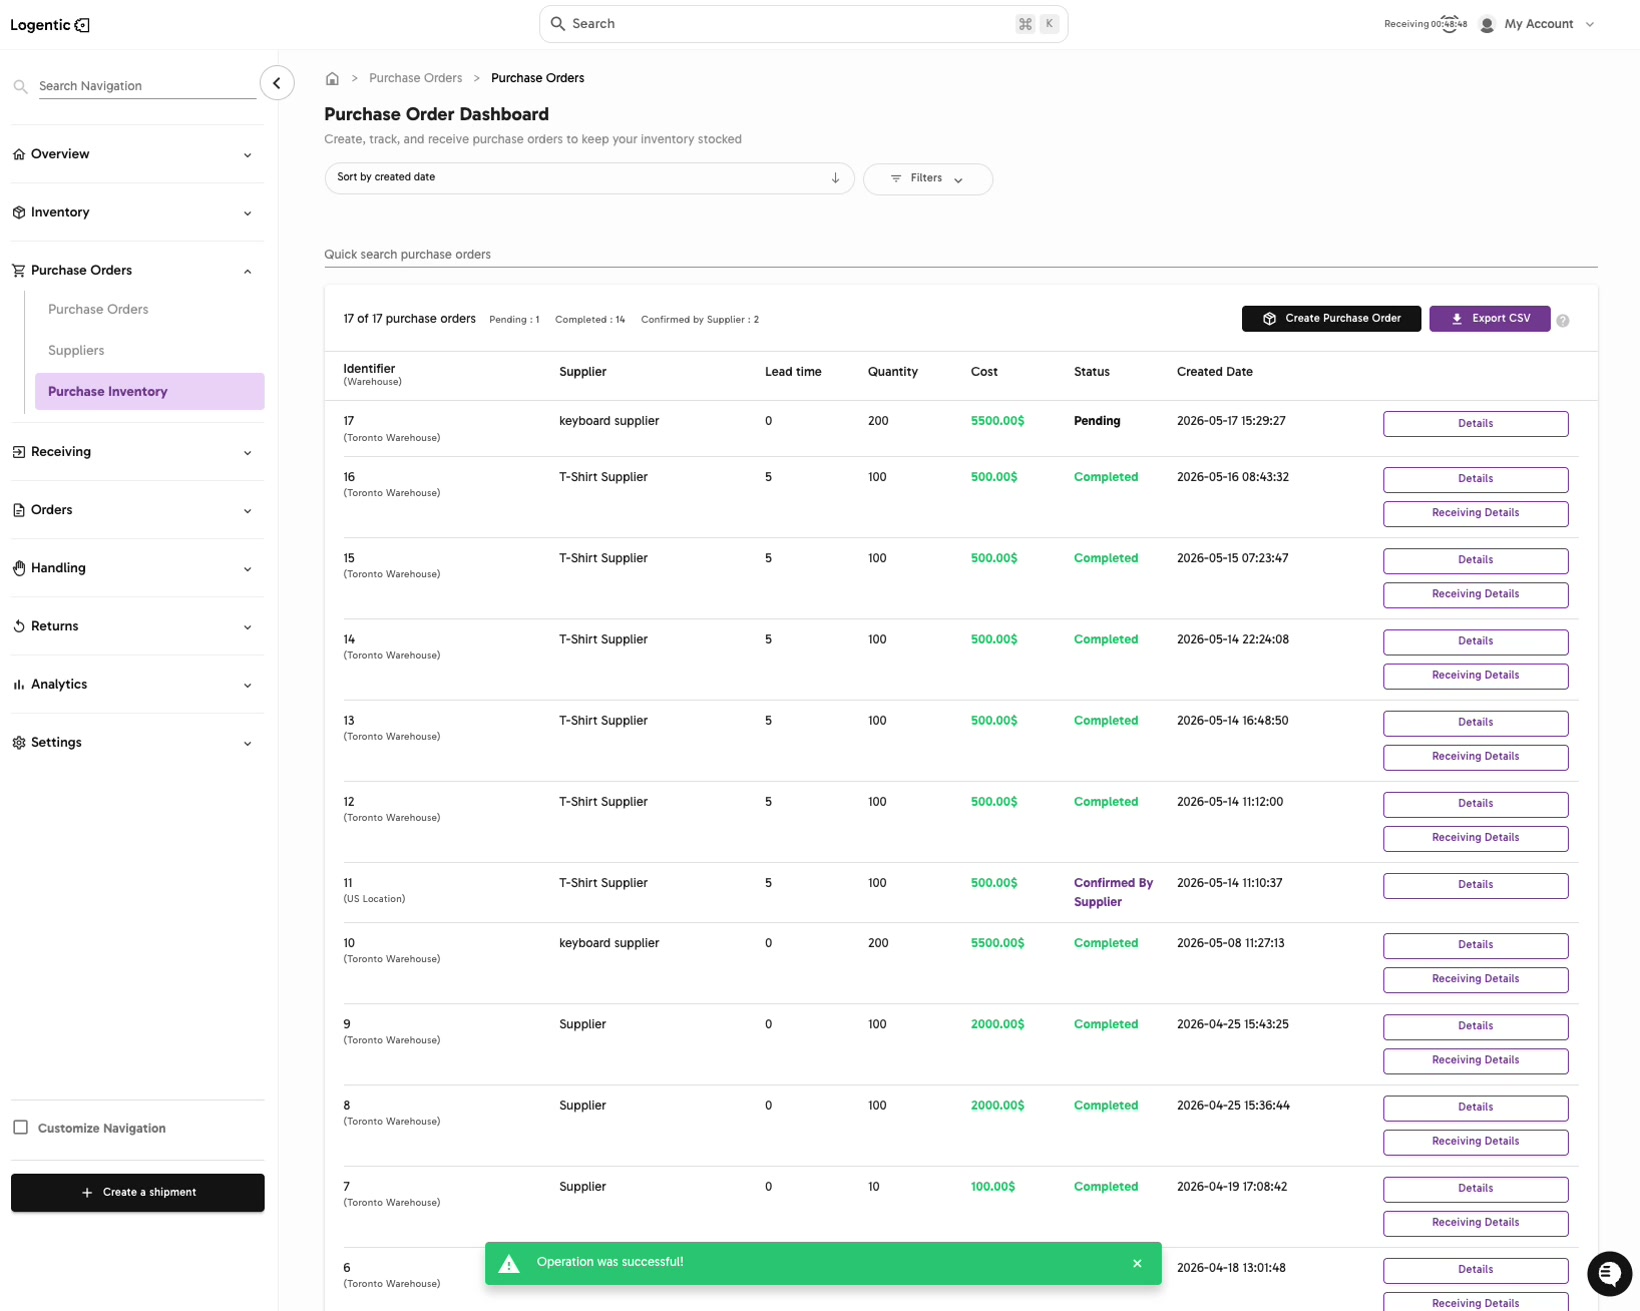
- Confirm the success state and the new purchase order row on Purchase Order Dashboard.
Screenshots
Steps 3-5: Select products in Purchase Inventory, then select Create Purchase Order.
Steps 6-8: If selected products span different suppliers or warehouses, choose one supplier group to create this PO.
Steps 9-11: Choose the supplier and warehouse for the purchase order.
Steps 12-16: Review products, cost per unit, cost, and entered quantities before continuing.
Steps 17-20: Review purchase order settings, addresses, shipping company, product shipment details, and submit the PO.
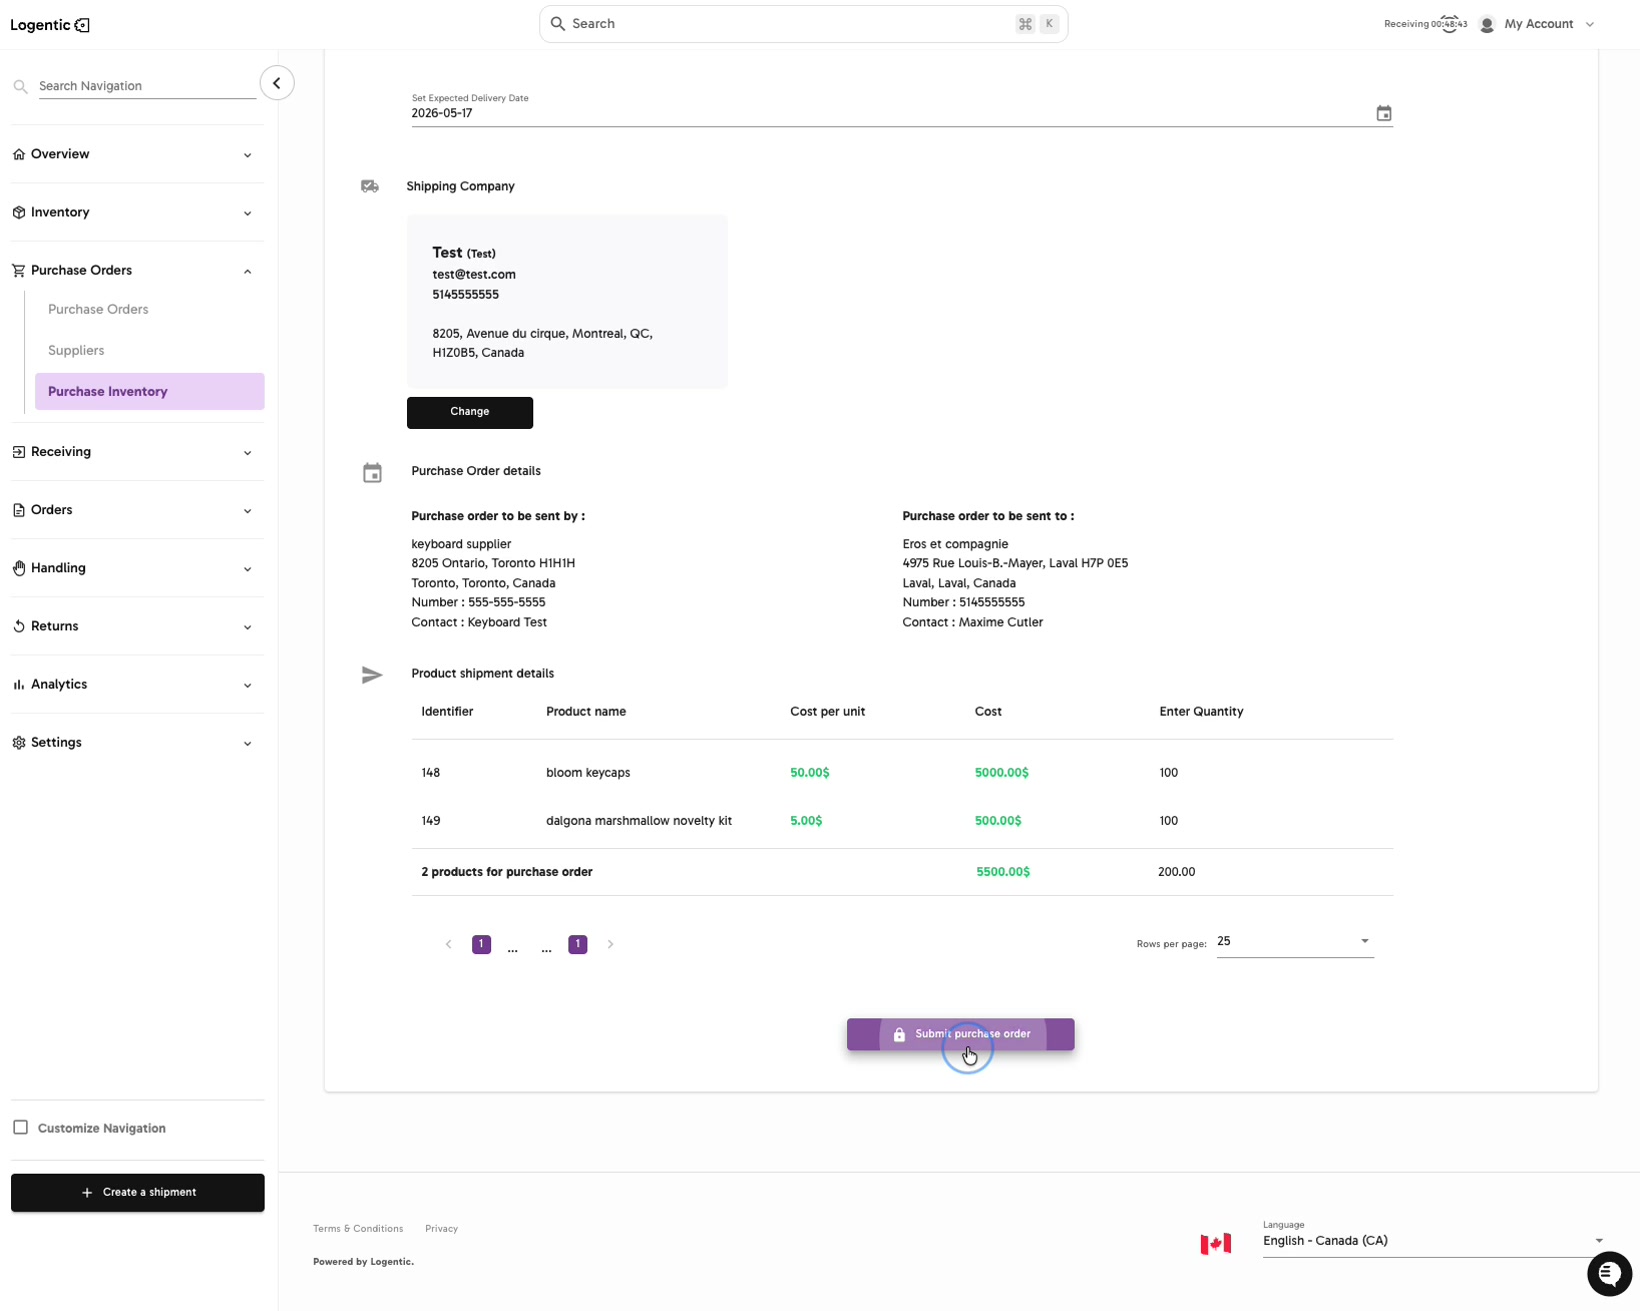
Step 21: Confirm the success state and the new PO row on Purchase Order Dashboard.
What good looks like
Logentic shows a success state, and the new purchase order appears on Purchase Order Dashboard with the expected supplier, warehouse, quantity, cost, status, and created date.
Common issues and next actions
| If this happens | What to do next |
|---|---|
| Logentic says the products are from different suppliers or warehouses. | Create one PO for one supplier and warehouse first, then create separate POs for the remaining selected products. |
| Next is not available on the product step. | Confirm that each product has a valid quantity and required cost information. |
| Submit purchase order is not available. | Review required PO settings, currency, expected delivery date, shipping company, and product quantities. |
| The PO does not appear after submission. | Return to Purchase Order Dashboard, clear filters, and search by supplier, warehouse, or created date. |
Contact us when
Products cannot be selected, supplier or warehouse options are wrong, required fields block submission, or the new purchase order does not appear after a success state.
Contact options
- Email Logentic Support: best for detailed requests, screenshots, or follow-up context.
- Open in-app chat: fastest when you are already signed in and need help in context.
- Call Logentic: call (855) 529-0009 for an urgent launch, warehouse, or fulfillment blocker.
- Request Slack support access: ask us to add your team to a shared Logentic support channel.
Send us this information
- Screenshot of the step where you are blocked.
- Product names, SKUs, or identifiers.
- Supplier and warehouse.
- Quantities and costs you entered.
- Expected PO result.
- Actual result shown in Logentic.
- Time and timezone.
Related workflow
- Review and filter Purchase Inventory.
- Adjust forecast settings if needed.
- Create the purchase order.
- Send the purchase order to the supplier.
- Receive the purchase order when inventory arrives.