How do I connect Shopify to Logentic with a custom app?
Last updated: May 20, 2026
Quick answer
Use this article to create a Shopify custom app for Logentic, grant the Shopify Admin API permissions Logentic needs, and add the Shopify connection details in Settings > Integrations.
Common use cases
- Store owner: Connect the correct Shopify store to Logentic before go-live.
- Shopify admin: Create or manage the custom app and grant API permissions.
- Operations lead: Choose whether products and orders should sync for the full store or only when they have the Logentic tag.
When to use this
- You are setting up the Shopify <> Logentic integration for the first time.
- You have Shopify store-owner access or Shopify admin access with app-development permissions.
- You need Logentic to sync Shopify products, orders, inventory, fulfillment updates, and webhooks.
When not to use this
- You only need to check whether Shopify is already connected.
- You need to rotate credentials for an existing integration.
- Shopify is asking for protected customer data approval and you are unsure what to submit.
- You are not sure which Shopify store, warehouse, location, tag, or launch date should be used.
At a glance
| What you are doing | What you need | Good result | Contact us if |
|---|---|---|---|
| Connecting Shopify to Logentic with a custom app. | Shopify store-owner or admin access, the required API scope groups, the store domain, credentials, and a Logentic admin account. | Shopify is connected in Logentic, sync settings match your launch plan, and you can intentionally sync products before importing orders. | Shopify blocks app creation, permissions are unclear, credentials need rotation, protected customer data is blocked, or Shopify and Logentic do not agree after setup. |
Important: Do not paste Shopify passwords, Admin API access tokens, API secret keys, client secrets, webhook secrets, or carrier credentials into chat. Enter credentials directly in Logentic or ask us for a secure handoff.
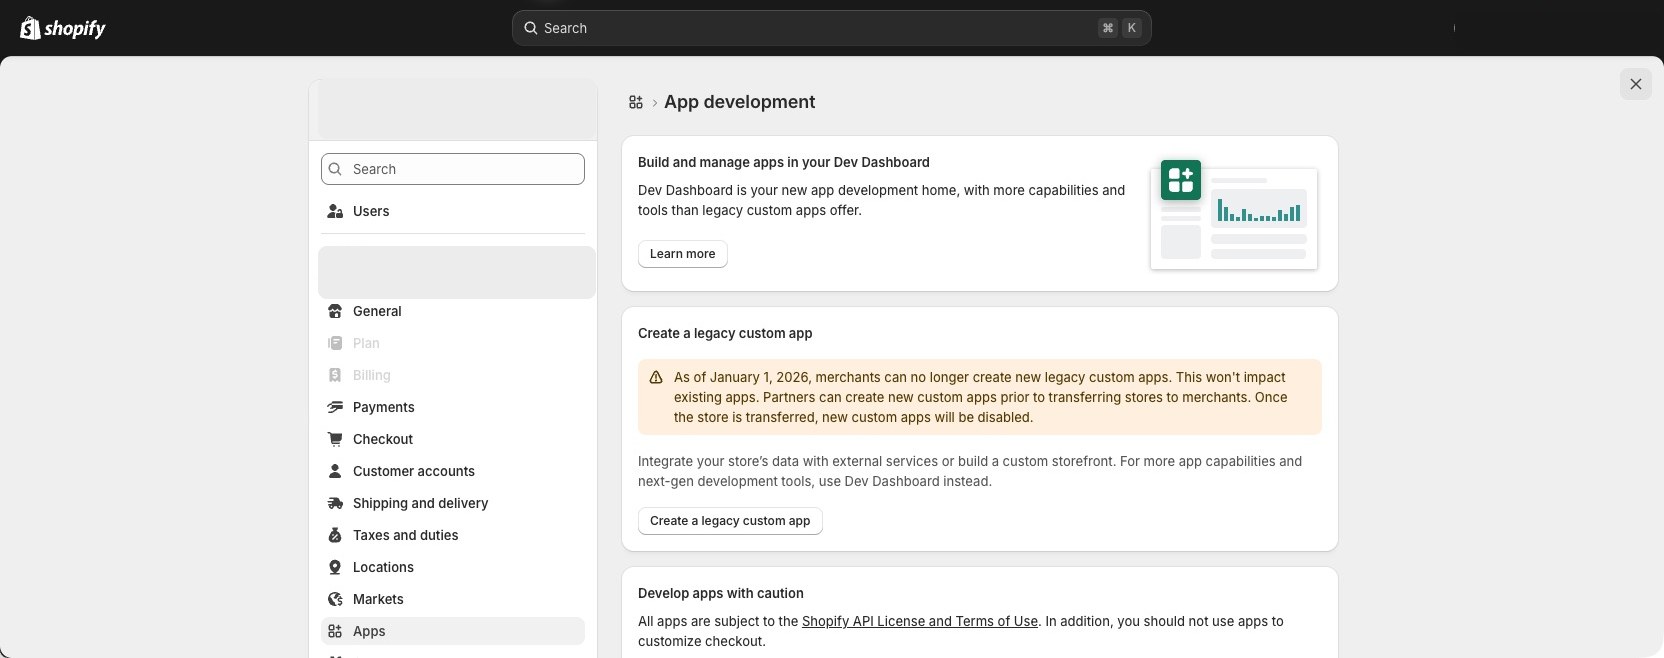
Note: Shopify's current developer docs say new custom apps are created through the Dev Dashboard or Shopify CLI. Existing admin-created custom apps can continue to work, but Shopify now warns that new legacy custom apps can no longer be created in Shopify admin. If your Shopify screen does not match these steps, follow Shopify's current Help Center flow and contact us before guessing.
Before you start
- Confirm the exact Shopify store that should connect to Logentic.
- Confirm you are the store owner or have Shopify permission to create/manage custom apps.
- Confirm whether Logentic should sync all products/orders or only items with the Logentic tag.
- Keep a secure place ready for credentials. Some Shopify credentials can only be revealed once.
- Open Logentic in another tab and sign in with an admin account.
Shopify API access to grant
In Shopify, these are Admin API access scopes, not endpoint URLs. Grant the minimum scopes Logentic asks for during setup, and treat the Logentic setup screen or Logentic support as the source of truth if your store needs a narrower or broader list.
For a standard Logentic WMS setup, expect these core scopes:
| Job | Shopify Admin API access scopes | Why Logentic needs it |
|---|---|---|
| Product catalog | read_products | Import products, variants, SKUs, barcodes, and product identifiers. |
| Orders | read_orders, write_orders | Import orders and send the order, fulfillment, or tracking updates required by the workflow. |
| Locations | read_locations | Match Shopify locations to the right Logentic warehouse context. |
| Inventory | read_inventory, write_inventory | Read Shopify inventory items/levels and push inventory quantity updates when inventory sync is enabled. |
Logentic will also ask for the fulfillment-order scope pair that matches your Shopify fulfillment setup:
| Fulfillment setup | Shopify Admin API access scopes | Use when |
|---|---|---|
| Merchant-managed warehouse location | read_merchant_managed_fulfillment_orders, write_merchant_managed_fulfillment_orders | Your Shopify fulfillment work stays under a merchant-managed location. |
| Fulfillment-service location assigned to Logentic | read_assigned_fulfillment_orders, write_assigned_fulfillment_orders | Fulfillment orders are assigned to a location managed by a Logentic fulfillment service. |
| Third-party fulfillment location | read_third_party_fulfillment_orders, write_third_party_fulfillment_orders | Logentic specifically tells you that third-party fulfillment-order access is required. |
For the Logentic Shopify integration, also include these scopes:
| Use case | Shopify Admin API access scopes | Why Logentic needs it |
|---|---|---|
| Older order history | read_all_orders | Import orders outside Shopify's default recent-order window. Shopify approval may be required. |
| Product updates back to Shopify | write_products | Create or update product/variant data in Shopify when the integration needs to keep product data aligned. |
| Shopify fulfillment-service records | read_fulfillments, write_fulfillments | Create or update Shopify fulfillment and tracking records from Logentic workflows. |
| Shopify returns sync | read_returns, write_returns | Sync Shopify returns with Logentic return workflows. |
| Shopify shipping/carrier-service setup | read_shipping, write_shipping | Support Shopify carrier-service or shipping configuration used by the integration. |
| Customer profile records | read_customers | Read customer records required by order, fulfillment, or support workflows. This may require protected-customer-data approval. |
For reference, the core scope string is:
```txt
read_products,read_inventory,write_inventory,read_orders,write_orders,read_locations
```
Then add the fulfillment-order pair that matches your Shopify fulfillment setup. For a merchant-managed warehouse location:
```txt
read_merchant_managed_fulfillment_orders,write_merchant_managed_fulfillment_orders
```
For a Logentic-managed fulfillment-service location:
```txt
read_assigned_fulfillment_orders,write_assigned_fulfillment_orders
```
Shopify API resources and webhook topics
Most new Shopify apps should use the GraphQL Admin API. The primary technical endpoint is:
```txt
POST https://{shop}.myshopify.com/admin/api/{version}/graphql.json
```
If a legacy REST implementation is used, these are the main resource endpoints behind the same access scopes:
| Resource | REST resource path pattern | Used for |
|---|---|---|
| Products and variants | /admin/api/{version}/products.json, /admin/api/{version}/products/{product_id}.json, /admin/api/{version}/variants/{variant_id}.json | Product, variant, SKU, barcode, and product identifier sync. |
| Orders | /admin/api/{version}/orders.json, /admin/api/{version}/orders/{order_id}.json | Order import and order-state review. |
| Fulfillment orders | /admin/api/{version}/orders/{order_id}/fulfillment_orders.json, /admin/api/{version}/fulfillment_orders/{fulfillment_order_id}.json, /admin/api/{version}/assigned_fulfillment_orders.json?assignment_status={status}&location_ids[]={location_id} | Fulfillment-order assignment and picking/packing work context. |
| Fulfillment order actions | /admin/api/{version}/fulfillment_orders/{fulfillment_order_id}/hold.json, /admin/api/{version}/fulfillment_orders/{fulfillment_order_id}/release_hold.json, /admin/api/{version}/fulfillment_orders/{fulfillment_order_id}/move.json, /admin/api/{version}/fulfillment_orders/{fulfillment_order_id}/reschedule.json, /admin/api/{version}/fulfillment_orders/{fulfillment_order_id}/cancel.json | Hold, release, move, reschedule, or cancel fulfillment work when the Shopify workflow allows it. |
| Fulfillments and tracking | /admin/api/{version}/fulfillments.json, /admin/api/{version}/fulfillment_orders/{fulfillment_order_id}/fulfillments.json, /admin/api/{version}/orders/{order_id}/fulfillments.json, /admin/api/{version}/fulfillments/{fulfillment_id}/update_tracking.json, /admin/api/{version}/fulfillments/{fulfillment_id}/cancel.json | Create fulfillment records, read fulfillments, update tracking, or cancel a fulfillment when the workflow allows it. |
| Locations | /admin/api/{version}/locations.json | Shopify location mapping. |
| Inventory | /admin/api/{version}/inventory_items.json, /admin/api/{version}/inventory_levels.json, /admin/api/{version}/inventory_levels/set.json, /admin/api/{version}/inventory_levels/adjust.json | Inventory item lookup and inventory level updates. |
| Webhooks | /admin/api/{version}/webhooks.json | Webhook subscription review or setup when the app is not using app-configuration webhooks. |
When Use Webhooks is enabled, Logentic may ask for these Shopify topics:
| Workflow | Webhook topics |
|---|---|
| App health | app/uninstalled, app/scopes_update |
| Orders | orders/create, orders/updated, orders/cancelled, orders/edited, orders/fulfilled, orders/partially_fulfilled |
| Fulfillment orders | fulfillment_orders/order_routing_complete, fulfillment_orders/placed_on_hold, fulfillment_orders/hold_released, fulfillment_orders/cancelled, fulfillment_orders/moved, fulfillment_orders/merged, fulfillment_orders/split, fulfillment_orders/rescheduled |
| Products | products/create, products/update, products/delete |
| Inventory | inventory_items/create, inventory_items/update, inventory_items/delete, inventory_levels/connect, inventory_levels/update, inventory_levels/disconnect |
| Locations | locations/create, locations/update, locations/delete, locations/activate, locations/deactivate |
| Returns, when enabled | returns/request, returns/approve, returns/update, returns/close, returns/reopen, returns/cancel, returns/process, returns/decline, refunds/create |
Important: Only grant the permissions needed for your Logentic setup. If Shopify blocks a permission, asks for approval, or warns about protected customer data, contact us before submitting a guess.
Steps in Shopify
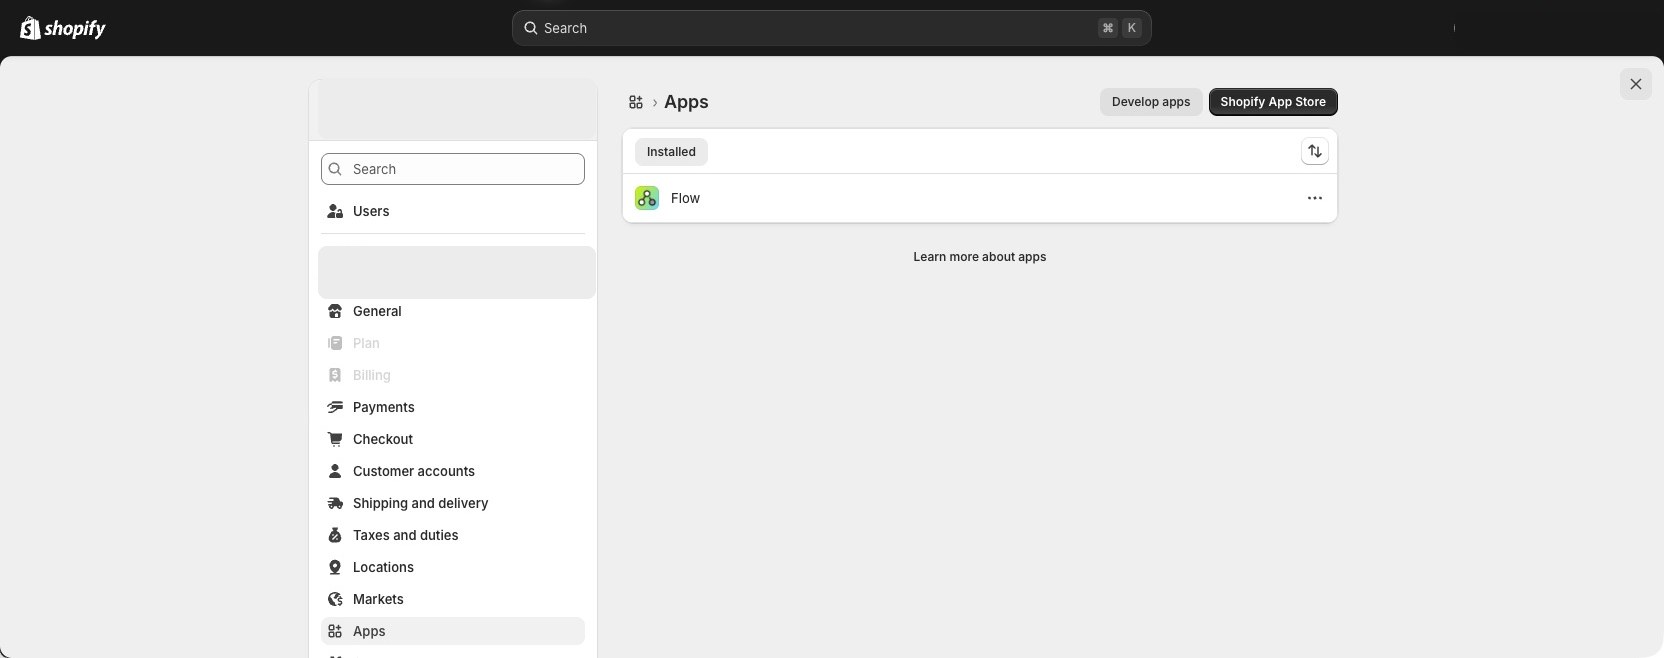
- In Shopify, go to Settings.
- Open Apps and sales channels or Apps, depending on your Shopify admin.
- Select Develop apps.
- On App development, confirm Shopify is directing new custom app setup to the Dev Dashboard.
- Do not choose Create a legacy custom app unless Logentic confirms you are managing an existing legacy app or Shopify explicitly allows that path for your account.
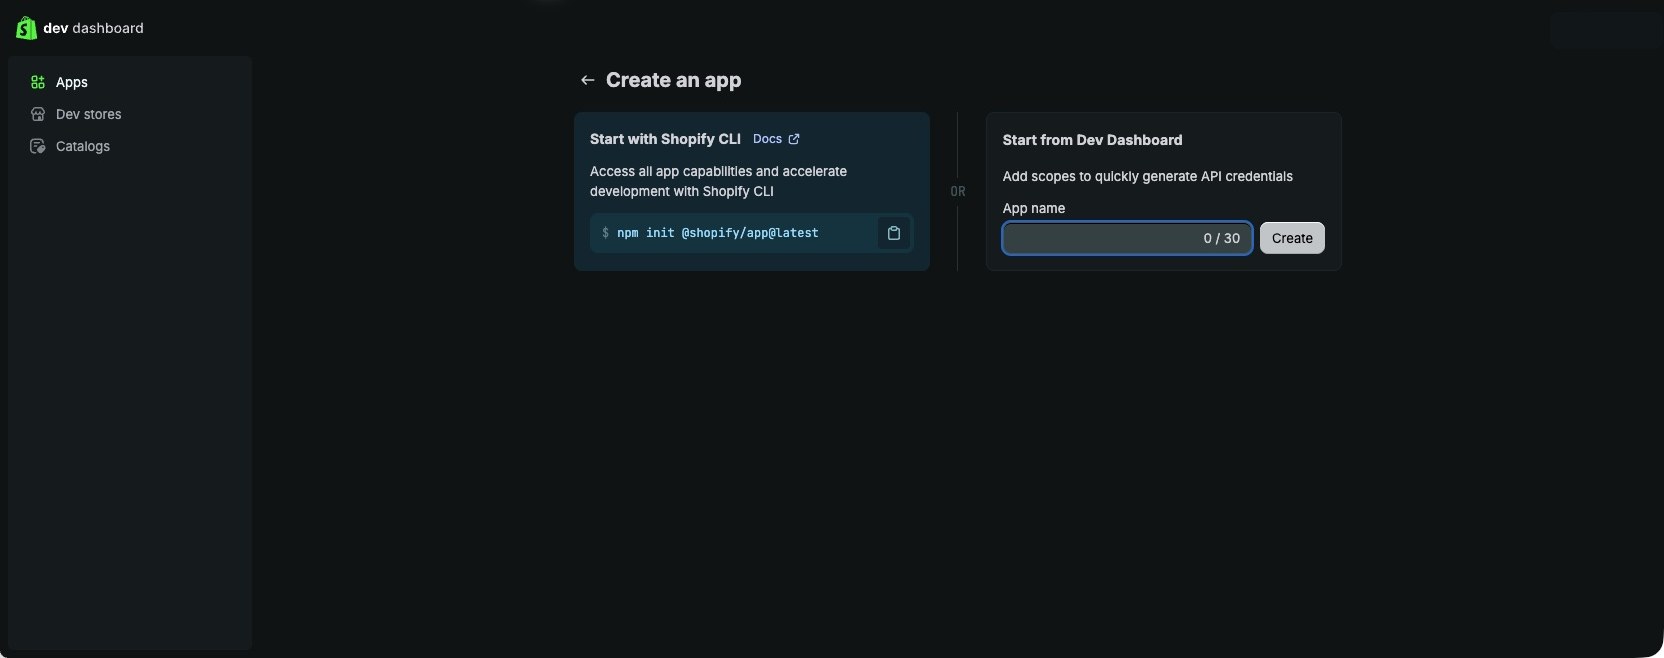
- Open the Shopify Dev Dashboard while signed in to the Shopify organization that owns the store.
- Open Apps, then select Create app.
- Under Start from Dev Dashboard, name the app Logentic WMS or another name your team will recognize.
- Create or edit the app version.
- In the app version, add the Admin API access scopes requested by Logentic.
- Select a webhook API version if Shopify asks for one.
- Release the app version.
- Install the custom app on the correct Shopify store.
- Confirm which credentials Shopify shows for your app:
- For the current Dev Dashboard flow, Shopify uses the app's Client ID and Client Secret to generate an API access token through a developer flow.
- Shopify's Help Center says you cannot copy and send an access token directly from Shopify admin in the current Dev Dashboard flow.
- For legacy custom apps created before January 1, 2026, Shopify may still show an Admin API access token, API key, and API secret key.
- Store credentials securely until they are entered in Logentic or handed off through a secure Logentic-approved path.
Steps in Logentic
- In Logentic, go to Settings.
- Open Integrations.
- In Manage Integrations, open the Shopify integration card if one exists.
- Select Add New Integration if Shopify is not connected yet.
- Select Shopify as the integration source.
- Enter the Shopify store domain. Use the store's
myshopify.comdomain, such asyour-store.myshopify.com. - Enter the Shopify credentials that match your Shopify app path and the Logentic fields.
- Set the first order import date. Use a date that matches your launch or migration plan.
- Set the optional last order import date only if you intentionally want to limit the first order import.
- Decide whether to enable Use Webhooks for automatic Shopify updates.
- Decide whether to enable Products - Restrict to Logentic Tag.
- Decide whether to enable Orders - Restrict to Logentic Tag.
- Save or add the integration.
- Run Sync Shopify products first.
- Review a few products in Logentic and confirm SKUs, barcodes, variants, and inventory context look right.
- Run Sync Shopify orders only when you are ready to import the intended order range.
- Review at least one synced order in Logentic before go-live.
Screenshots
Shopify steps 1-3: Open Settings > Apps, then select Develop apps.
Shopify steps 4-6: Review App development and use the Dev Dashboard path for new app setup.
Shopify steps 7-8: In Dev Dashboard, select Create app and name the app from Start from Dev Dashboard.
Logentic steps 1-5: Open Settings > Integrations, then add or open the Shopify integration.
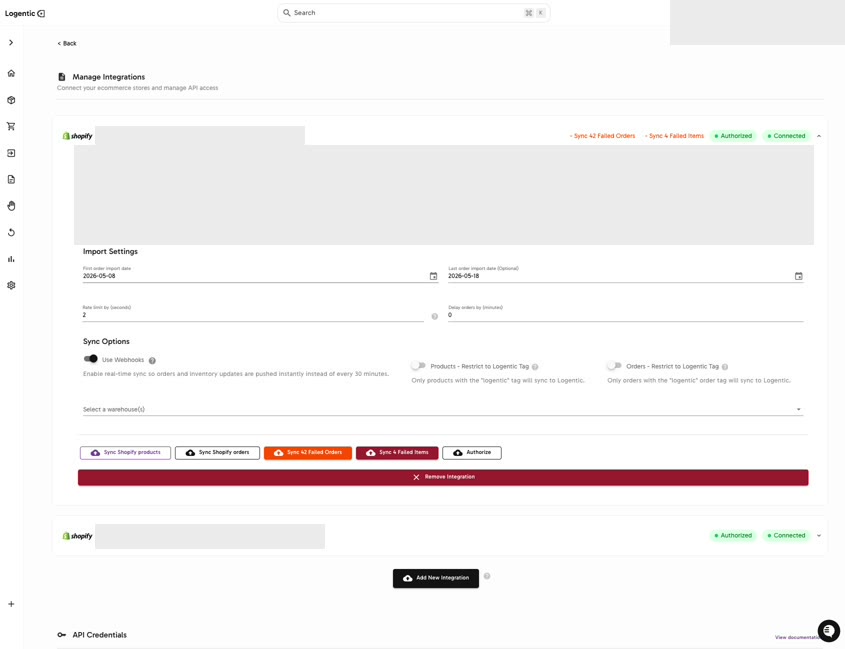
Logentic steps 6-13: Review the Shopify integration settings, import dates, webhook setting, tag restrictions, and manual sync controls.
Logentic steps 14-17: After setup, use the Shopify sync controls and review API Credentials and Webhooks without exposing secrets.
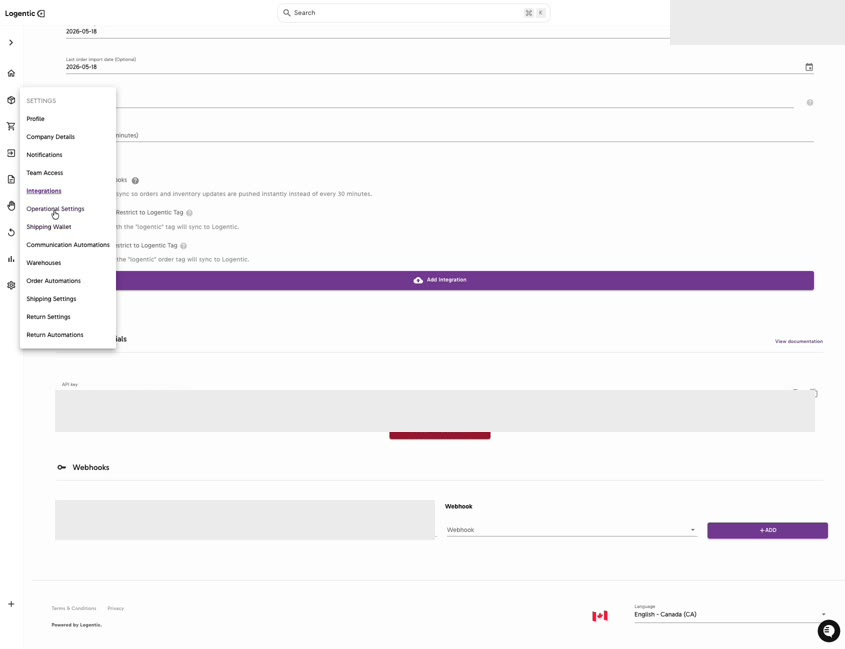
Note: Shopify screenshots were captured on May 18, 2026 and masked before publishing. Shopify can change labels and permission screens, so use Shopify's current Help Center links below as the source of truth if your screen differs.
What good looks like
Shopify appears connected in Logentic, credentials are not shared in chat, the sync options match your launch plan, and your team can sync products before importing the first intended order range.
Common issues and next actions
| If this happens | What to do next |
|---|---|
| You cannot see Develop apps or cannot open the Dev Dashboard. | Ask the store owner to confirm your Shopify app-development permissions and organization access. |
| Shopify shows legacy custom-app screens instead of the Dev Dashboard. | Continue only if the app already exists or Shopify allows that path for your store. Contact us before relying on old setup instructions. |
| A required permission is missing or blocked. | Do not skip it silently. Contact us with a screenshot of the Shopify permissions screen, with secrets hidden. |
| Shopify asks about protected customer data. | Contact us before submitting. The answer depends on the store, app path, Shopify plan, and required data access. |
| Shopify does not show an access token in the current Dev Dashboard flow. | Do not try to invent one. Contact us so we can complete the secure developer-side token step. |
| Credentials were revealed once and lost. | Contact us before deleting or reinstalling anything. Token rotation can interrupt syncs and webhooks. |
| Products sync but orders do not. | Confirm order permissions, import date, tag restrictions, and whether the orders are in scope. |
| Inventory looks different in Shopify and Logentic. | Check the SKU, variant, warehouse/location mapping, and whether inventory sync is expected for that product. |
| Webhooks are enabled but updates are not appearing. | Contact us with the Shopify store, affected order/SKU, webhook setting screenshot, and expected result. |
Contact us when
Shopify blocks app creation, you cannot grant a required permission, protected customer data approval is unclear, credentials need to be rotated, webhooks are failing, products or orders do not sync after setup, or the integration affects live orders, live inventory, or go-live timing.
Contact options
- Email Logentic Support: best for detailed requests, screenshots, or follow-up context.
- Open in-app chat: fastest when you are already signed in and need help in context.
- Call Logentic: call (855) 529-0009 for an urgent launch, warehouse, or fulfillment blocker.
- Request Slack support access: ask us to add your team to a shared Logentic support channel.
Send us this information
- Shopify store domain.
- Whether Shopify used the Dev Dashboard or an existing legacy custom-app screen.
- Screenshot of selected Admin API permissions, with secrets hidden.
- Screenshot of the Logentic Shopify integration settings, with secrets hidden.
- Which credentials Logentic is asking for.
- First order import date and optional last order import date.
- Whether Use Webhooks is enabled.
- Whether product/order tag restrictions are enabled.
- One example SKU, product, order, or variant that should sync.
- Expected result.
- Actual result.
Related workflow
- Prepare Shopify setup context.
- Create and name the Shopify custom app in Dev Dashboard.
- Add the integration details in Logentic.
- Sync products first.
- Sync the intended order range.
- Run a first Shopify test order before go-live.
Useful links
- How do I prepare Shopify before Logentic setup?
- How do I review Shopify, API credentials, and webhooks?
- Why did an order not sync?
- Why is Shopify inventory not updating?
- Shopify Help Center: custom apps
- Shopify Help Center: installing and setting up apps
- Shopify developer docs: access tokens and new custom-app path
- Shopify developer docs: about token acquisition
- Shopify API access scopes
- Shopify REST Admin API: FulfillmentOrder resource
- Shopify REST Admin API: AssignedFulfillmentOrder resource
- Shopify REST Admin API: Fulfillment resource
- Shopify webhooks reference